Host
The host property is an object of a Map type and specifies the events, actions, properties and attributes related to the resulting element.
Use the following Angular CLI command to generate a new host-events component for the tests:
ng g component host-events
Also, replace the content of the main application component template with your component declaration:
<!-- src/app/app.component.html -->
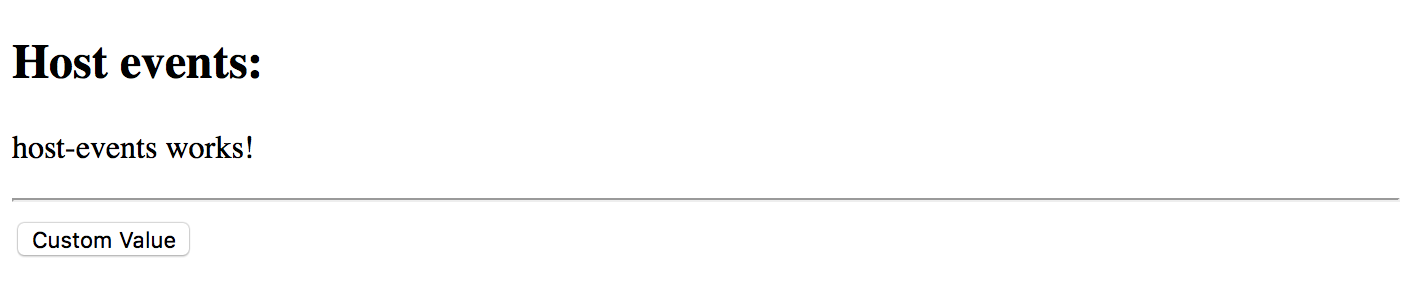
<h2>Host events:</h2>
<app-host-events></app-host-events>
Run the application and ensure the main page looks similar to the following:

CSS Class
Your component or directive can assign a class name to the corresponding DOM element that serves the root of the component.
For example setting the class name to the host-events value looks like the following:
// src/app/host-events/host-events.component.ts

@Component({
  selector: 'app-host-events',
  templateUrl: './host-events.component.html',
  styleUrls: ['./host-events.component.css'],
  host: {
    class: 'host-events'
  }
})
export class HostEventsComponent implements OnInit {
  //...
}
At runtime, if you use the "Inspect element" tool to view the compiled HTML output, it should look similar to the following:
<app-host-events _ngcontent-c0="" class="host-events" _nghost-c1="">
    <p _ngcontent-c1="">
        host-events works!
    </p>
</app-host-events>
Note that the main app-host-events element has now the host-events class name associated with it.
You can also set multiple classes based on property values using the following format:
host: {
    '[class.<className1>]': '<statement1>',
    '[class.<classNameN>]': '<statementN>'
}
Let's bind a couple of CSS class names to the component class properties:
// src/app/host-events/host-events.component.ts

@Component({
  selector: 'app-host-events',
  templateUrl: './host-events.component.html',
  styleUrls: ['./host-events.component.css'],
  host: {
    '[class.is-invalid]': 'isInvalid',
    '[class.is-readonly]': 'isReadonly'
  }
})
export class HostEventsComponent implements OnInit {
    // ...

    isInvalid: boolean = false;
    isReadonly: boolean = false;
}
The class values are toggled based on the corresponding property values.
For example, the is-invalid is appended to the class list of the DOM element as soon as the isInvalid property value turns to true,
also, is automatically removed from the class list if it has the value of false.
Host Events
The component or directive you create can also use host metadata property to bind element events to the class methods.
The usage format, in this case, is as follows:
host: {
    '(<event>)': '<statement>'
}
To test the event bindings in action let's wire the mouseenter and mouseleave DOM events
with the onMouseEnter and onMouseLeave methods that are going to change the color property value:
// src/app/host-events/host-events.component.ts

import { Component } from '@angular/core';

@Component({
  selector: 'app-host-events',
  templateUrl: './host-events.component.html',
  styleUrls: ['./host-events.component.css'],
  host: {
    class: 'host-events',
    '(mouseenter)': 'onMouseEnter()',
    '(mouseleave)': 'onMouseLeave()'
  }
})
export class HostEventsComponent {

  color = 'black';

  onMouseEnter() {
    this.color = 'red';
  }

  onMouseLeave() {
    this.color = 'black';
  }

}
Finally, update the component template to use the color property like in the example below:
<!-- src/app/host-events/host-events.component.html -->

<p [style.color]="color">
  host-events works!
</p>
Now, switch to the running application and try moving the mouse cursor over the component text. You should see the colour of the text changing automatically upon mouse events.

Your component can also listen to global events using the following format:
host: {
    '(<target>:<event>)': '<statement>'
}
Where 'target' can be of one the following values:
- window
- document
- body
For example, the component can listen to 'window.resize' events and adapt the layout accordingly:
// src/app/host-events/host-events.component.ts
// ...

@Component({
  // ...

  host: {
    class: 'host-events',
    '(mouseenter)': 'onMouseEnter()',
    '(mouseleave)': 'onMouseLeave()',
    '(window:resize)': 'onWindowResize()'
  }
})
export class HostEventsComponent {

  // ...

  onWindowResize() {
    console.log('Window resized');
  }

}
If you run the developer tools in your browser and try resizing the browser window, you should notice the component reacts on that and writes corresponding messages to the console log.
Host Attributes
The Angular framework allows you to map multiple HTML attributes to the class properties or static string values.
Let's set the role and aria-label attributes from within the host metadata:
// src/app/host-events/host-events.component.ts
// ...

@Component({
  // ...

  host: {
    class: 'host-events',
    '(mouseenter)': 'onMouseEnter()',
    '(mouseleave)': 'onMouseLeave()',
    '(window:resize)': 'onWindowResize()',
    'role': 'button',
    'aria-label': 'Demo button'
  }
})
export class HostEventsComponent {
  // ...
}
As soon as the page gets rendered, you can inspect the compiled HTML layout to check the element attributes.
The app-host-events element now contains the expected attributes:
<app-host-events _ngcontent-c0="" aria-label="Demo button" class="host-events" role="button" _nghost-c1="">
    <p _ngcontent-c1="" style="color: black;">
        host-events works!
    </p>
</app-host-events>
Host Properties
Finally, you can bind component properties to element properties. That might be useful when developing Angular directives.
For example, a directive that automatically changes the button value based on one of its properties can look like the following:
// src/app/host-properties.directive.ts

import { Directive } from '@angular/core';

@Directive({
  selector: '[appHostProperties]',
  host: {
    '[innerHTML]': 'value'
  }
})
export class HostPropertiesDirective {

  value = 'Custom Value';

}
Now, let's define a simple button and see the directive in action:
<!-- src/app/app.component.html -->

<h2>Host events:</h2>
<app-host-events></app-host-events>

<hr>
<button appHostProperties>Click me</button>
Note that we provided the button text in the HTML template. Switch back to the browser window and ensure the button value got changed by the directive as per the host metadata settings.
Similar to the CSS classes, you can provide values for multiple attributes of the decorated DOM element using the following syntax:
host: {
    '[attr.<name1>]': '<statement1>',
    '[attr.<nameN>]': '<statementN>',
}
Let's bind a "custom1" attribute to the "attrValue" property of the class to check how that feature works.
import { Directive } from '@angular/core';

@Directive({
  selector: '[appHostProperties]',
  host: {
    '[innerHTML]': 'value',
    '[attr.custom1]': 'attrValue'
  }
})
export class HostPropertiesDirective {

  value = 'Custom Value';
  attrValue = 'some attribute value';
}
If you remember, we got a button element declared in the main application template like below:
<button appHostProperties>Click me</button>
At the runtime, the element gets a custom attribute from the directive:
<button _ngcontent-c0="" apphostproperties="" custom1="some attribute value">Custom Value</button>
Source code
You can find the source code as an Angular CLI project in the angular/components/component-host folder.